AS3 debugging interface with BinderUI
BinderUI is a debugging tools to help you create interfaces and debug values.
Very often I’m sure you spend time building visual interfaces to set, to see and to debug some values. This can be useful for example to show to the creative (or even the client?) and extract the right values instead of tweaking thing for ages, I’m sure you know what I mean.
That can be time consuming and is often very annoying so I wanted to ease the process (1 line of code and a metadata tag).
BinderUI is a simple static class and the idea is to “bind” a value to visual components such as slider, knob, meter, text input, and so on. For the components I used the library minimalComps.
That means that the bound values will update the components in real-time and the components will update the values (two-ways). I used the BindingUtils and ChangeWatcher classes from the mx package but as it will be for debugging, you can use it on project that will be pure AS3 as well.
As a quick example, imagine you have a custom darkness property on your custom class, you can bind the value this way:
BinderUI.displaySliderHorizontal(this, \_mySprite, "darkness", "darkness", null, 0.1, 1, -255, 255);This will create a slider that will update (and be updated) for your darkness property.
You’ll also need to add a Bindable metadata in your class:
[Bindable]
public class MySprite extends Sprite {
Note: in case you want to debug built-in flash properties (such as x and y), you’ll need to override the properties in your custom class even if it does nothing.
override public function get x():Number {
  return super.x;
}
override public function set x(value:Number):void {
  super.x = value;
}
For now you can debug only properties (getters and setters), and types that are String, Number, Boolean (and color).
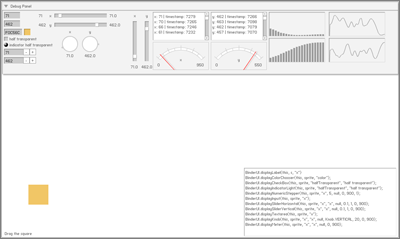
Here is a list of component that can be used.
BinderUI.displayLabel(this, s, "x");
BinderUI.displayColorChooser(this, sprite, "color", 0xFFFF00);
BinderUI.displayCheckBox(this, sprite, "halfTransparent", "half transparent");
BinderUI.displayIndicatorLight(this, sprite, "halfTransparent", "half transparent");
BinderUII.displayNumericStepper(this, sprite, "x", 5, null, 0, 900, 1);
BinderUI.displayInput(this, sprite, "x");
BinderUI.displaySliderHorizontal(this, sprite, "x", "x", null, 0.1, 1, 0, 900);
BinderUI.displaySliderVertical(this, sprite, "x", "x", null, 0.1, 1, 0, 900);
BinderUI.displayTextarea(this, sprite, "x");
BinderUI.displayKnob(this, sprite, "x", "x", null, Knob.VERTICAL, 20, 0, 900);
BinderUI.displayMeter(this, sprite, "x", "x", null, 0, 900);
In some case, it is harder to bind values, such as when you want to update a component from what you type in a textfield. You’ll need to dispatch an event yourself (usually these events are added by the compiler with the Bindable metadata tag).
dispatchEvent(new PropertyChangeEvent(PropertyChangeEvent.PROPERTY\_CHANGE, false, false, PropertyChangeEventKind.UPDATE, 'text', oldValue, newValue, this));About colors, you can use the displayColorChooser method. The easiest is using a “color” property for example.
BinderUI.displayColorChooser(this, mySprite, "color");You can also use the colorTransform property but this property is not bindable, so it will work only in one way (component —> target):
BinderUI.displayColorChooser(this, mySprite.transform, "color");You can also use the MinimalConfigurator to create your interface from an XML file.
Three methods are available to dispose (remove and destroy) components. You can dispose by target, by component or dispose everything.
BinderUI.disposeByTarget(mySprite); BinderUI.disposeByComponent(myComponent) BinderUI.dispose();